我如何声明式地安装 NixOS
原文由 Michael Stapelberg 于 发布,订阅该博客
在我的一次网络存储主机组装中,我想为Flatcar Container Linux寻找替代方案,于是时隔近十年后再次尝试了NixOS。安装 NixOS 的方式有很多,本文将介绍我偏好的安装方式:在物理机或虚拟机上,通过网络以完全声明式的方式完成安装。
引言:什么是声明式?
“声明式”一词指的是你只需描述要实现什么,而无需说明如何实现。对于 NixOS 而言,这意味着你只需声明希望系统包含哪些软件(添加到配置项environment.systemPackages,或启用某个模块),而不是去执行 apt install 之类的命令。
声明式方法的一个好处是,系统会跟随你的配置变化,因此只需回退配置,就能干净地回退系统上的变更。
我喜欢用版本控制(通常是 Git)来管理这些声明式配置文件。
最初搭建现在这套网络存储系统时,我选择了 CoreOS(后来的 Flatcar Container Linux),因为它是一个能够自动更新的基础系统,并支持声明式的cloud-init配置。
NixOS 的安装方式
图形化安装程序:仅适用于桌面
NixOS 手册的“安装”一节介绍了图形化安装程序(面向桌面用户,基于Calamares系统安装器,于 2022 年加入)和手动安装程序。
使用图形化安装程序,将 NixOS 安装到磁盘非常简单:一直确认默认选项就能得到一个可用的系统。但它也有一些缺点:
- 安装完成后需要手动在本地启用 SSH,无法通过网络操作。
- 图形化安装程序会为你生成一份初始 NixOS 配置,但无法注入你自己的初始配置。
显然,图形化安装程序并非为远程安装或自动化安装而设计。
手动安装
而手动安装程序对我来说则过于繁琐:可以展开NixOS 手册“安装概要”一节中的“示例 2”和“示例 3”来感受一下。需要说明的是,这些步骤本身并不难,但在时间紧迫时我不想用这种方式来安装系统。一来,手动操作在压力下很容易出错;二来,交互式地复制粘贴命令,恰恰与编写声明式配置文件背道而驰。
网络安装:nixos-anywhere
理想情况下,我希望大部分安装工作都能在自己的电脑前舒适地完成,这意味着安装程序必须支持通过网络使用。同时,我希望机器在安装完成后能立刻以一份可用的初始 NixOS 配置启动起来(无需任何手动步骤!)。
幸运的是,已经有了一个(由社区提供的)解决方案:nixos-anywhere。你只需负责启动 NixOS 安装程序,然后运行一条命令,nixos-anywhere 就会通过 SSH 连接到该安装环境,自动对磁盘进行分区并将 NixOS 安装到磁盘上。值得一提的是,nixos-anywhere 本身也是声明式配置的,因此你可以随时重复这一过程。
(我知道 nixos-anywhere 甚至可以通过 SSH 连接到任意系统并用 kexec 重启进入 NixOS 安装环境,这确实是个很酷的技巧,但在我看来,显式启动安装程序的方式风险更小、通用性和可重复性也更好,因此我更偏好后者。)
准备工作:安装 Nix
我想在其中一台机器上使用 NixOS,但(暂时)不想在主力台式机上使用。
因此,我只在 Arch Linux 上安装了 nix 工具(用于构建,即使不运行 NixOS):
% sudo pacman -S nix
% sudo groupadd -r nixbld
% for n in $(seq 1 24); do sudo useradd -c "Nix build user $n" \
    -d /var/empty -g nixbld -G nixbld -M -N -r -s "$(which nologin)" \
    nixbld$n; done
% sudo systemctl enable --now nix-daemon.socket
现在,运行 nix-shell -p hello 应该会进入一个新的 shell,其中已经安装了 GNU hello 软件包:
% export NIX_PATH=nixpkgs=channel:nixos-25.05
% nix-shell -p hello
hello

[nix-shell:/tmp]$ hello
Hello, world!顺带一提,Arch Linux wiki 上的 Nix 页面讲解了如何使用 nix 来安装软件包,但这并不是我关心的:我只想远程管理 NixOS 系统。
构建自己的安装程序
前面我说过“你负责启动 NixOS 安装程序”,这很容易做到:把 ISO 镜像写入 U 盘并用它启动机器(或在虚拟机中选择该 ISO 并启动)即可。
但在通过 SSH 远程登录之前,我们需要手动设置密码。我还需要带上 TERM=xterm 环境变量来建立 SSH 连接,因为我常用的终端 rxvt-unicode 的 termcap 文件并未包含在默认的 NixOS 安装环境中。同样,我配置的 locale 也无法使用,我偏好的 shell(Zsh)也没有提供。
如果安装程序能预先配置好一个顺手的环境,岂不是更好?
对于 Debian、Fedora 或 Arch Linux 等其他发行版,我不会去尝试重新构建官方的安装 ISO 镜像。我相信它们的流程和工具都很完善,但我也确信那将是我需要额外学习、调试和维护的东西。
但构建 NixOS 安装程序与配置一个普通的 NixOS 系统非常相似:同样的配置、同样的构建工具。具体流程在官方 NixOS wiki中有文档说明。
我把通常会写在 configuration.nix 里的自定义配置复制出来,从 nixpkgs 导入了 installation-cd-minimal.nix 模块,并将结果保存为 iso.nix 文件:
{ config, pkgs, ... }:

{
  imports = [
    <nixpkgs/nixos/modules/installer/cd-dvd/installation-cd-minimal.nix>
    <nixpkgs/nixos/modules/installer/cd-dvd/channel.nix>
  ];

  i18n.supportedLocales = [
    "en_DK.UTF-8/UTF-8"
    "de_DE.UTF-8/UTF-8"
    "de_CH.UTF-8/UTF-8"
    "en_US.UTF-8/UTF-8"
  ];
  i18n.defaultLocale = "en_US.UTF-8";

  security.sudo.wheelNeedsPassword = false;
  users.users.michael = {
    openssh.authorizedKeys.keys = [
      "ssh-ed25519 AAAAC3NzaC1lZDI1NTE5secret"
      "ssh-ed25519 AAAAC3NzaC1lZDI1NTE5key"
    ];

    isNormalUser = true;
    description = "Michael Stapelberg";
    extraGroups = [ "wheel" ];
    initialPassword = "SGZ3odMZIesxTuh2Y2pUaJA";  # random for this post
    shell = pkgs.zsh;
    packages = with pkgs; [];
  };

  environment.systemPackages = with pkgs; [
    git  # for checking out github.com/stapelberg/configfiles
    rsync
    zsh
    vim
    emacs
    wget
    curl
    rxvt-unicode  # for terminfo
    lshw
  ];

  programs.zsh.enable = true;
  services.openssh.enable = true;

  # This value determines the NixOS release from which the default
  # settings for stateful data, like file locations and database versions
  # on your system were taken. It‘s perfectly fine and recommended to leave
  # this value at the release version of the first install of this system.
  # Before changing this value read the documentation for this option
  # (e.g. man configuration.nix or on https://nixos.org/nixos/options.html).
  system.stateVersion = "25.05"; # Did you read the comment?
}
要构建 ISO 镜像,我设置了 NIX_PATH 环境变量,让nix-build(1)指向 iso.nix 文件,并选择 NixOS 25.05 的上游 channel:
% export NIX_PATH=nixos-config=$PWD/iso.nix:nixpkgs=channel:nixos-25.05
% nix-build '<nixpkgs/nixos>' -A config.system.build.isoImage在我的2025 年高端 Linux 主机上大约 1.5 分钟后,安装镜像就生成在 result/iso/nixos-minimal-25.05.802216.55d1f923c480-x86_64-linux.iso(在我的环境中大小为 1.46 GB)。
启用 Nix Flakes
遗憾的是,尽管新的命令行界面(CLI)已经推出 5 年多,nix 项目仍未默认启用这个“实验性”功能,因此我们需要创建一个配置文件来启用现代的 nix-command 接口:
% mkdir -p ~/.config/nix
% echo 'experimental-features = nix-command flakes' >> ~/.config/nix/nix.conf如何区分新旧命令?旧命令用连字符连接(nix-build),新命令则用空格分隔(nix build)。
你会注意到我还启用了Nix flakes,我用它来让 nix 构建是 hermetic 的、并锁定到 nixpkgs 以及构建中包含的其他 nix 模块的特定版本。我喜欢把 flakes 比作其他编程环境中的版本锁定文件:其理念是 5 个月后构建系统,得到的结果与今天完全一致。
要验证 flakes 是否生效,请运行 nix shell(而非 nix-shell):
% nix shell nixpkgs#hello
/tmp 2 % hello
Hello, world!
(重)安装步骤
作为参考,下面是我在 Proxmox 中为 NixOS 创建新虚拟机时使用的配置。最重要的设置是 bios=ovmf(即 UEFI 启动,并非默认值),这样我就可以在物理机和虚拟机上使用相同的引导加载程序配置:
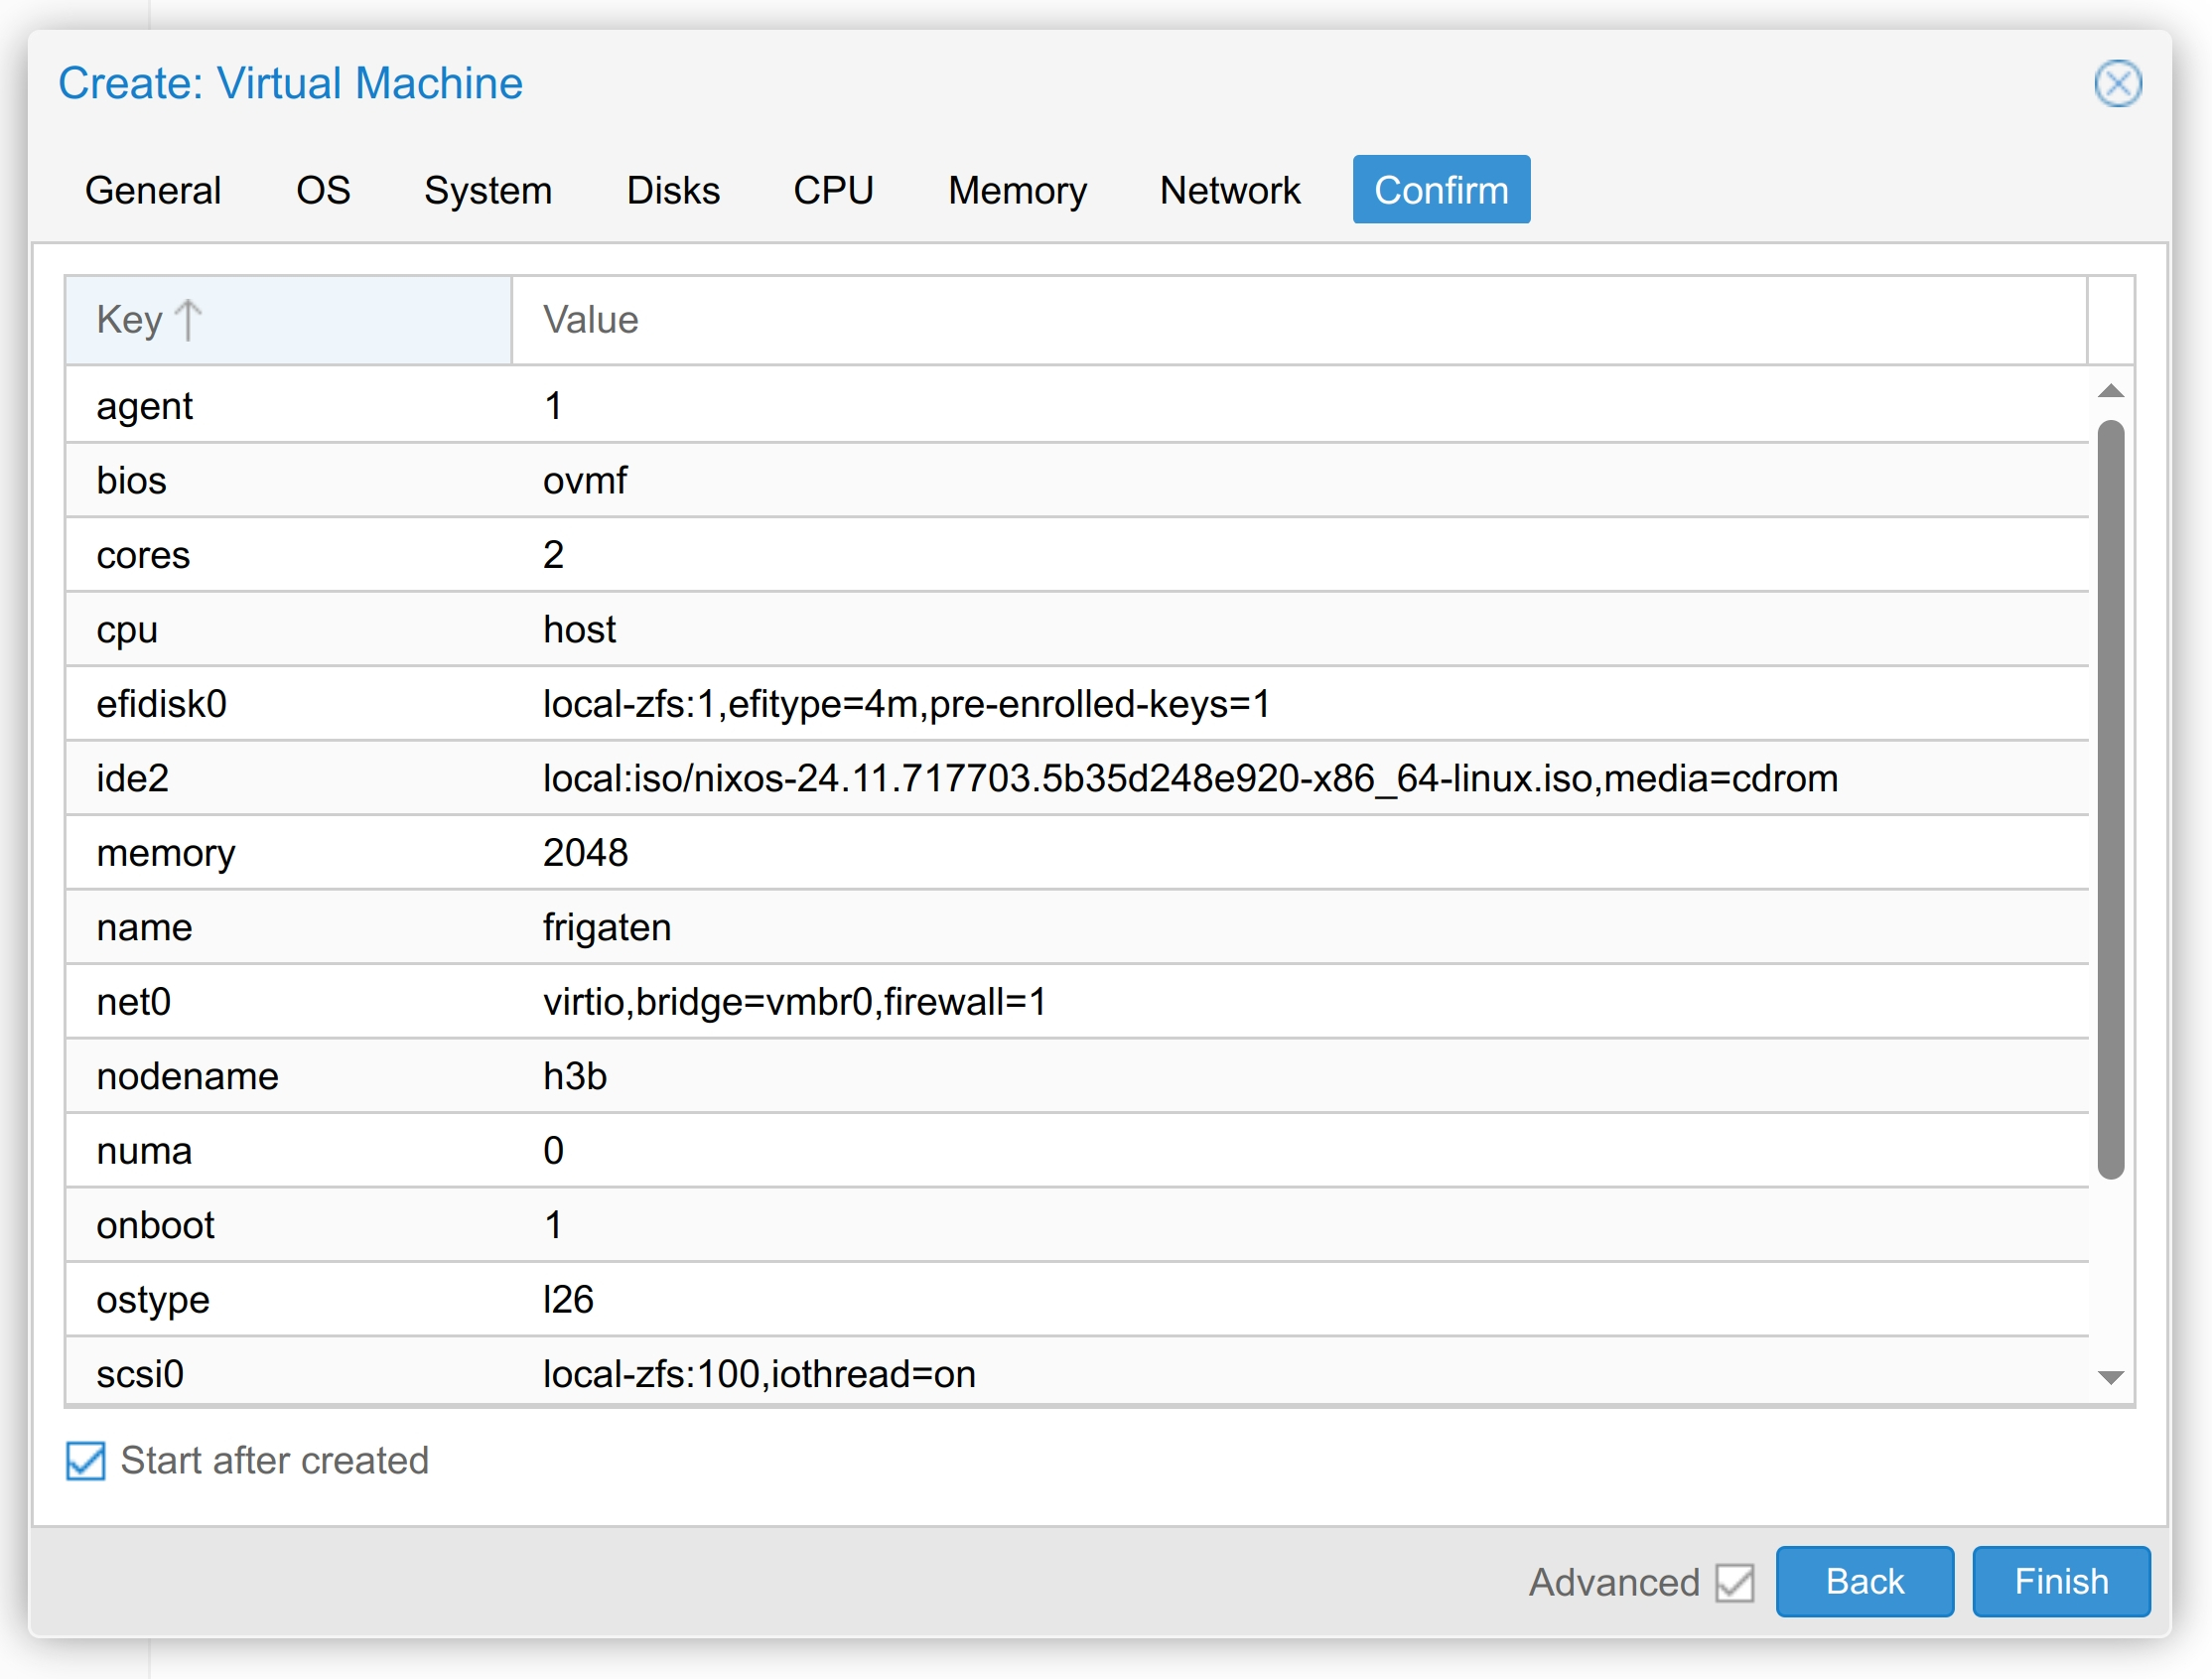
在启动我们这个(未签名的)安装程序之前,需要进入 UEFI 设置并禁用 Secure Boot。例如,Proxmox 默认是启用 Secure Boot 的。
然后,在目标系统上启动自定义的安装 ISO,并确保 ssh [email protected] 无需输入密码即可连接。
创建一个 flake.nix,内容如下:
{
  inputs = {
    nixpkgs.url = "github:nixos/nixpkgs/nixos-25.05";

    disko.url = "github:nix-community/disko";
    # Use the same version as nixpkgs
    disko.inputs.nixpkgs.follows = "nixpkgs";
  };

  outputs =
    {
      nixpkgs,
      disko,
      ...
    }:
    let
      system = "x86_64-linux";
      pkgs = import nixpkgs {
        inherit system;
        config.allowUnfree = false;
      };
    in
    {
      nixosConfigurations.zammadn = nixpkgs.lib.nixosSystem {
        inherit system;
        inherit pkgs;
        modules = [
          disko.nixosModules.disko
          ./configuration.nix
        ];
      };
      formatter.${system} = pkgs.nixfmt-tree;
    };
}
在 disk-config.nix 中声明磁盘配置:
disk-config.nix
{ lib, ... }:

{
  disko.devices = {
    disk = {
      main = {
        device = lib.mkDefault "/dev/sda";
        type = "disk";
        content = {
          type = "gpt";
          partitions = {
            ESP = {
              type = "EF00";
              size = "500M";
              content = {
                type = "filesystem";
                format = "vfat";
                mountpoint = "/boot";
                mountOptions = [ "umask=0077" ];
              };
            };
            root = {
              size = "100%";
              content = {
                type = "filesystem";
                format = "ext4";
                mountpoint = "/";
              };
            };
          };
        };
      };
    };
  };
}
在 configuration.nix 中声明你期望的 NixOS 配置:
{ modulesPath, lib, pkgs, ... }:

{
  imports =
    [
      (modulesPath + "/installer/scan/not-detected.nix")
      ./hardware-configuration.nix
      ./disk-config.nix
    ];

  # Adding michael as trusted user means
  # we can upgrade the system via SSH (see Makefile).
  nix.settings.trusted-users = [ "michael" "root" ];
  # Clean the Nix store every week.
  nix.gc = {
    automatic = true;
    dates = "weekly";
    options = "--delete-older-than 7d";
  };

  boot.loader.systemd-boot = {
    enable = true;
    configurationLimit = 10;
  };
  boot.loader.efi.canTouchEfiVariables = true;

  networking.hostName = "zammadn";
  time.timeZone = "Europe/Zurich";

  # Use systemd for networking
  services.resolved.enable = true;
  networking.useDHCP = false;
  systemd.network.enable = true;

  systemd.network.networks."10-e" = {
    matchConfig.Name = "e*";  # enp9s0 (10G) or enp8s0 (1G)
    networkConfig = {
      IPv6AcceptRA = true;
      DHCP = "yes";
    };
  };

  i18n.supportedLocales = [
    "en_DK.UTF-8/UTF-8"
    "de_DE.UTF-8/UTF-8"
    "de_CH.UTF-8/UTF-8"
    "en_US.UTF-8/UTF-8"
  ];
  i18n.defaultLocale = "en_US.UTF-8";

  users.mutableUsers = false;
  security.sudo.wheelNeedsPassword = false;
  users.users.michael = {
    openssh.authorizedKeys.keys = [
      "ssh-ed25519 AAAAC3NzaC1lZDI1NTE5secret"
      "ssh-ed25519 AAAAC3NzaC1lZDI1NTE5key"
    ];

    isNormalUser = true;
    description = "Michael Stapelberg";
    extraGroups = [ "networkmanager" "wheel" ];
    initialPassword = "install";  # TODO: change!
    shell = pkgs.zsh;
    packages = with pkgs; [];
  };

  environment.systemPackages = with pkgs; [
    git  # for checking out github.com/stapelberg/configfiles
    rsync
    zsh
    vim
    emacs
    wget
    curl
  ];

  programs.zsh.enable = true;

  services.openssh.enable = true;

  # This value determines the NixOS release from which the default
  # settings for stateful data, like file locations and database versions
  # on your system were taken. It‘s perfectly fine and recommended to leave
  # this value at the release version of the first install of this system.
  # Before changing this value read the documentation for this option
  # (e.g. man configuration.nix or on https://nixos.org/nixos/options.html).
  system.stateVersion = "25.05"; # Did you read the comment?
}
……然后锁定它:
% nix flake lock- 使用 nixos-anywhere,从安装程序中获取 hardware-configuration.nix 并将 NixOS 安装到磁盘:
% nix run github:nix-community/nixos-anywhere -- \
  --flake .#zammadn \
  --generate-hardware-config nixos-generate-config ./hardware-configuration.nix \
  --target-host [email protected]
大约一分钟后,我的虚拟机就安装完成并重启了!
完整的 nixos-anywhere 安装日志,如果你感兴趣的话
% nix run github:nix-community/nixos-anywhere -- \
  --flake .#wiki \
  --generate-hardware-config nixos-generate-config ./hardware-configuration.nix \
  --target-host [email protected]
[... transcript truncated for brevity but contains full nixos-anywhere log ...]
### Installing NixOS ###
installing the boot loader...
setting up /etc...
Created "/boot/EFI".
installation finished!
### Rebooting ###
### Done! ###
安装后步骤
现在系统的声明式部分已经就绪,我们需要处理有状态的部分。
在我的场景中,唯一需要配置的有状态部分是 Tailscale 组网 VPN。
要配置 Tailscale,我通过 SSH 登录并运行 sudo tailscale up。然后按提示链接将新节点加入网络。之后,在Tailscale Machines 控制台中,我会禁用密钥过期并添加 ACL 标签。
后续变更
现在,每当我在配置文件中做了修改,我就会通过 nixos-rebuild 远程将变更部署到 NixOS 系统:
% nix run nixpkgs#nixos-rebuild -- \
  --target-host michael@zammadn \
  --use-remote-sudo \
  switch \
  --flake .#zammadn
请注意,并非所有变更都会在 nixos-rebuild switch 过程中完全生效:虽然 systemd 服务通常会被重启,但新需要的内核模块不会自动加载(例如在 Frigate 中启用 edgetpu Coral 硬件加速器后)。
因此,为确保所有变更都已生效,请在部署后 reboot 重启系统。
NixOS 的一个优势在于,你可以在启动菜单中选择要运行的系统世代。如果最新的变更导致了问题,你可以快速重启并回退到上一个世代来撤销变更。当然,你也可以撤销配置修改并部署一个新的世代——视具体情况选择更方便的方式即可。
总结
通过本文,我希望能传达那些在我刚开始使用 Nix 和 NixOS 时希望有人能告诉我的要点:
- 启用 flakes 和新的 CLI。
- 使用 nixos-anywhere 进行远程安装。
- 如果需要,可以构建自定义安装程序,很简单!
- 使用
nixos-rebuild内置的--target-host参数进行远程部署。
接下来该做什么?
- 阅读nixos.org → Learn上的所有文档。
- 这里有几篇来自我身边的人写的文章,供你参考,排名不分先后:
- Michael Lynch 写了关于使用 NixOS 搭建 Oracle Cloud 虚拟机以及管理他的 Zig 配置的文章。
- Nelson Elhage 写了关于使用 Nix 测试数十个 Python 解释器,作为他对Python 3.14 尾调用解释器性能研究一部分的文章。
- Vincent Bernat 写了关于使用 Nix 为 ARM 单板计算机构建 SD 卡镜像的文章。
- Mitchell Hashimoto 分享了他详尽的 NixOS 配置。
- Wolfgang 有一个关于在家庭服务器上使用 NixOS 的 YouTube 视频(→ 他的配置)
- 联系你当地的 Nix 社区!我最近参加了Nix Zürich 小组的“Zero Hydra Failures”活动,那里热情的人们很乐意聊各种关于 Nix 的话题 :)
评论
登录后参与讨论