zerocal —— 用 Rust 打造、跑在 shuttle.rs 上的無伺服器行事曆 App
原文由 Matthias Endler 于 發布,訂閱此部落格
我和朋友們偶爾會約吃飯。我很珍惜這些相聚的夜晚,但最痛苦的部分就是喬時間!
我們在群組裡丟個訊息。
等大家回覆。
喬定一個日期。
有人發出行事曆邀請。
事情總算搞定了。
除了吃飯本身,其他過程一點都不好玩。
身為一個理智的人,你可能會想:「幹嘛不用個喬時間的 App 就好?」
我試過很多,沒有一個好用。全都……太麻煩了!
就讓我發個邀請,想來的人就來,不行嗎?
- 我不想為了你的行事曆/喬時間/什麼碗糕 App 還要去註冊帳號。
- 我不想還要去加朋友。
- 我不想還要去加朋友的朋友。
- 我不想還要去加朋友的朋友的朋友。
- 你懂我的意思吧:我就是想丟個邀請出去,然後不用收到你的回覆。
阿宅內向工程師的解法
💡 我們絕對需要的,就是再來一個可以建立活動、然後用連結發送邀請的行事曆 App!你肯定沒想到會是這個吧?
喔,還有,我不想用 Google Calendar 來建立活動,因為我 不 信任他們。
跟任何理智的人一樣,我想要一個能直接從終端機建立行事曆項目的方法。
上次我就是這樣跟朋友們提案的。他們的回應是:「不知道耶,聽起來像是為了解決問題而硬找問題來解。」但你知道大家怎麼說的:別問海星怎麼帶路。
與其多說,不如直接做
那天晚上我回到家,就架了一個網站,可以直接從 GET 參數產生行事曆項目。
它讓你可以直接在命令列輕鬆建立行事曆活動:
> curl https://zerocal.shuttleapp.rs?start=2022-11-04+20:00&duration=3h&title=Birthday&description=paaarty
BEGIN:VCALENDAR
VERSION:2.0
PRODID:ICALENDAR-RS
CALSCALE:GREGORIAN
BEGIN:VEVENT
DTSTAMP:20221002T123149Z
CLASS:CONFIDENTIAL
DESCRIPTION:paaarty
DTEND:20221002T133149Z
DTSTART:20221002T123149Z
SUMMARY:Birthday
UID:c99dd4bb-5c35-4d61-9c46-7a471de0e7f4
END:VEVENT
END:VCALENDAR
接著你就可以把它存成檔案,再用你的行事曆 App 開啟。
> curl https://zerocal.shuttleapp.rs?start=2022-11-04+20:00&duration=3h&title=Birthday&description=paaarty > birthday.ics
> open birthday.ics
某種程度上,這算是個「無伺服器行事曆 App」,哈哈。伺服器上完全沒有狀態,只是即時產生一個行事曆活動然後回傳而已。
我是怎麼做出來的
你可能已經注意到網址裡有「shuttleapp.rs」。那是因為我用 shuttle.rs 來架這個網站。
Shuttle 是專門給 Rust 專案用的託管服務,我早就想試試看了。
要用超讚的 axum 網頁框架來初始化專案,我執行了
cargo install cargo-shuttle
cargo shuttle init --axum --name zerocal zerocal
然後就看到了一切開始所需的基本程式碼:
use axum::{routing::get, Router};
use sync_wrapper::SyncWrapper;

async fn hello_world() -> &'static str {
  "Hello, world!"
}

#[shuttle_service::main]
async fn axum() -> shuttle_service::ShuttleAxum {
  let router = Router::new().route("/hello", get(hello_world));
  let sync_wrapper = SyncWrapper::new(router);

  Ok(sync_wrapper)
}
快速把變更 commit 一下:
git add .gitignore Cargo.toml src/
git commit -m "Hello World"
要部署程式碼,得先註冊一個 Shuttle 帳號。你可以在 https://www.shuttle.rs/login 完成註冊。
它會請你授權存取你的 Github 帳號。
接著:
cargo shuttle login最後:
cargo shuttle deploy現在來看看 zerocal.shuttleapp.rs:
Hello World!部署第一個版本花不到 5 分鐘。真不錯!我們的客製化行事曆 App 已經準備就緒。
開始寫 App
要建立行事曆活動,我用了 icalendar 這個 crate(感謝 hoodie 做了這個好用的函式庫!)。iCalendar 是個建立行事曆活動的標準,大多數行事曆 App 都有支援。
cargo add icalendar
cargo add chrono # For date and time parsing
來建立一個示範用的行事曆活動:
let event = Event::new()
  .summary("test event")
  .description("here I have something really important to do")
  .starts(Utc::now())
  .ends(Utc::now() + Duration::days(1))
  .done();
夠簡單吧。
要怎麼回傳檔案!?
現在我們有了行事曆活動,得把它回傳給使用者。但要怎麼當成檔案回傳呢?
在 axum 裡有個動態回傳檔案的範例在這裡。
async fn calendar() -> impl IntoResponse {
  let ical = Calendar::new()
    .push(
      // add an event
      Event::new()
        .summary("It works! 😀")
        .description("Meeting with the Rust community")
        .starts(Utc::now() + Duration::hours(1))
        .ends(Utc::now() + Duration::hours(2))
        .done(),
    )
    .done();

  CalendarResponse(ical)
}
這裡有幾個值得注意的地方:
- 每個行事曆檔案都是一組活動的集合,所以我們把活動包在代表集合的
Calendar物件裡。 impl IntoResponse是一個 trait,讓我們可以回傳任何有實作它的型別。CalendarResponse是包在Calendar外面的新類型包裝(newtype wrapper),有實作IntoResponse。
這是 CalendarResponse 的實作:
/// Newtype wrapper around Calendar for `IntoResponse` impl
#[derive(Debug)]
pub struct CalendarResponse(pub Calendar);

impl IntoResponse for CalendarResponse {
  fn into_response(self) -> Response {
    let mut res = Response::new(boxed(Full::from(self.0.to_string())));
    res.headers_mut().insert(
      header::CONTENT_TYPE,
      HeaderValue::from_static("text/calendar"),
    );
    res
  }
}
我們只是建立一個新的 Response 物件,然後把 Content-Type 標頭設為 iCalendar 檔案正確的 MIME 類型:text/calendar。接著就回傳這個回應。
加上日期解析
這部分有點 hacky,隨便看看就好。我們需要從 query string 解析日期和時長。我用了 dateparser,因為它支援超多種日期格式。
async fn calendar(Query(params): Query<HashMap<String, String>>) -> impl IntoResponse {
  let mut event = Event::new();
  event.class(Class::Confidential);

  if let Some(title) = params.get("title") {
    event.summary(title);
  } else {
    event.summary(DEFAULT_EVENT_TITLE);
  }
  if let Some(description) = params.get("description") {
    event.description(description);
  } else {
    event.description("Powered by zerocal.shuttleapp.rs");
  }

  if let Some(start) = params.get("start") {
    let start = dateparser::parse(start).unwrap();
    event.starts(start);
    if let Some(duration) = params.get("duration") {
      let duration = humantime::parse_duration(duration).unwrap();
      let duration = chrono::Duration::from_std(duration).unwrap();
      event.ends(start + duration);
    }
  }

  if let Some(end) = params.get("end") {
    let end = dateparser::parse(end).unwrap();
    event.ends(end);
    if let Some(duration) = params.get("duration") {
      if params.get("start").is_none() {
        let duration = humantime::parse_duration(duration).unwrap();
        let duration = chrono::Duration::from_std(duration).unwrap();
        event.starts(end - duration);
      }
    }
  }

  let ical = Calendar::new().push(event.done()).done();

  CalendarResponse(ical)
}
如果能支援更多人類可讀的日期格式,像是 now 和 tomorrow 就更棒了,不過就留到下次再說吧。
來測試一下:
> cargo shuttle run # This starts a local dev server
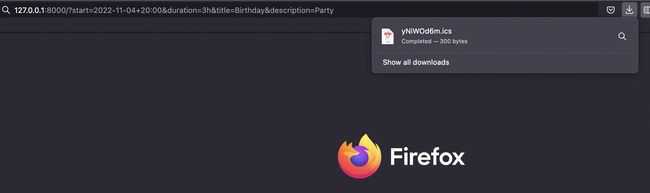
> curl 127.0.0.1:8000?start=2022-11-04+20:00&duration=3h&title=Birthday&description=Party
*🤖 bleep bloop, calendar file created*
不錯,可以動了!
在瀏覽器裡開啟它,就會在行事曆裡建立一個新活動:
至於那些不用終端機來建立行事曆活動的怪人們,我們也來幫網站加個表單吧。
加上表單
<form>
  <table>
    <tr>
      <td>
        <label for="title">Event Title</label>
      </td>
      <td>
        <input type="text" id="title" name="title" value="Birthday" />
      </td>
    </tr>
    <tr>
      <td>
        <label for="desc">Description</label>
      </td>
      <td>
        <input type="text" id="desc" name="desc" value="Party" />
      </td>
    </tr>
    <tr>
      <td><label for="start">Start</label></td>
      <td>
        <input type="datetime-local" id="start" name="start" />
      </td>
    </tr>
    <tr>
      <td><label for="end">End</label></td>
      <td>
        <input type="datetime-local" id="end" name="end" />
      </td>
    </tr>
  </table>
</form>
我稍微改了一下 calendar 函式,如果 query string 是空的,就回傳表單:
async fn calendar(Query(params): Query<HashMap<String, String>>) -> impl IntoResponse {
  // if query is empty, show form
  if params.is_empty() {
    return Response::builder()
      .status(200)
      .body(boxed(Full::from(include_str!("../static/index.html"))))
      .unwrap();
  }

  // ...
}
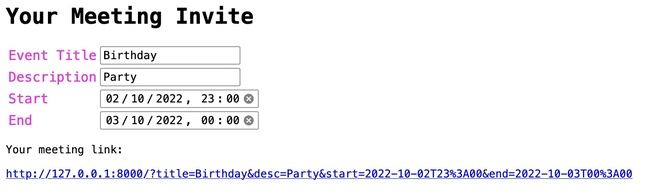
再稍微調整一下,我們就得到了一個充滿 Web 1.0 榮光的可愛小表單:
就是這樣!我們現在有了一個可以建立行事曆活動的小型網頁 App。嗯,差不多了。還得部署才行。
部署
cargo shuttle deploy對,就這樣。就是這麼簡單。感謝 shuttle.rs 的夥伴們讓這一切成真。
行事曆 App 現在已經在 zerocal.shuttleapp.rs 上線了。
現在我終於可以傳個行事曆活動的連結給朋友們,約下一次的 pub crawl 了。他們一定會很感激的。對啦對啦
用 100 行 Rust 從零到行事曆
天啊,再次寫些單純的 HTML 感覺真好。
做小 App 永遠不會膩。
去 GitHub 看看原始碼,幫我把它變得更好吧!🙏
這裡有些點子:
- ✅ 支援地點(例如
location=Berlin或location=https://zoom.us/test)。感謝 sigaloid。 - 支援更多人類可讀的日期格式(例如
now、tomorrow)。 - 支援重複發生的活動。
- 支援時區。
- 支援 Google 行事曆短連結(
https://calendar.google.com/calendar/render?action=TEMPLATE&dates=20221003T224500Z%2F20221003T224500Z&details=&location=&text=)。 - 加上從命令列建立行事曆活動的 bash 指令範例。
- 縮短網址(例如
zerocal.shuttleapp.rs/2022-11-04T20:00/3h/Birthday/Party)?
去看看 issue tracker,歡迎隨時發 PR!
留言
登入後參與討論