zerocal - shuttle.rs에서 돌아가는 Rust 서버리스 캘린더 앱
원문은 Matthias Endler님이 에 게재했습니다. 이 블로그 구독하기
가끔 친구들과 저녁 식사를 함께 한다. 그 저녁 시간 자체는 소중하지만, 가장 힘든 건 일정을 잡는 일이다!
단체 채팅방에 메시지를 보낸다.
답장을 기다린다.
날짜를 정한다.
누군가 캘린더 초대를 보낸다.
마침내 일이 성사된다.
저녁 식사 자체를 빼면 그 과정 중 즐거운 건 하나도 없다.
상식적인 사람이라면 이렇게 생각할 것이다: “그냥 스케줄링 앱을 쓰면 되지 않아?”.
나도 여러 앱을 써봤다. 하나같이 별로였다. 전부… 과하다!
그냥 초대장을 보내고, 오고 싶은 사람이 오면 되는 거 아닌가.
- 캘린더/스케줄링/뭐시기 앱을 쓰자고 계정을 만들고 싶지 않다.
- 친구들을 등록하고 싶지 않다.
- 친구의 친구를 등록하고 싶지 않다.
- 친구의 친구의 친구까지 등록하고 싶지 않다.
- 무슨 말인지 알겠지: 그냥 초대장을 보내고 당신한테서 아무 답도 받지 않고 싶을 뿐이다.
괴짜 내향형 엔지니어의 해법
💡 우리에게 정말 필요한 건 이벤트를 만들고 그 이벤트 링크로 초대를 보낼 수 있는 또 하나의 캘린더 앱이다! 전혀 예상 못 했지?
아, 그리고 Google Calendar로 이벤트를 만들고 싶지 않다. 난 그들을 믿지 않으니까.
상식적인 사람이라면 누구나 그렇듯, 나는 터미널에서 캘린더 항목을 만들고 싶었다.
지난번에 친구들에게 아이디어를 그렇게 설명했더니 돌아온 답은 “잘 모르겠는데, 문제에 맞춰 해결책을 찾는 것 같은데.”였다. 하지만 말하지 않나, 불가사리에게 길을 묻지 말라고.
백문이 불여일견
그날 밤 집에 가서 GET 파라미터로 캘린더 항목을 만들어 주는 웹사이트를 만들었다.
명령줄에서 편하게 캘린더 이벤트를 만들 수 있다:
> curl https://zerocal.shuttleapp.rs?start=2022-11-04+20:00&duration=3h&title=Birthday&description=paaarty
BEGIN:VCALENDAR
VERSION:2.0
PRODID:ICALENDAR-RS
CALSCALE:GREGORIAN
BEGIN:VEVENT
DTSTAMP:20221002T123149Z
CLASS:CONFIDENTIAL
DESCRIPTION:paaarty
DTEND:20221002T133149Z
DTSTART:20221002T123149Z
SUMMARY:Birthday
UID:c99dd4bb-5c35-4d61-9c46-7a471de0e7f4
END:VEVENT
END:VCALENDAR
그 결과를 파일로 저장한 뒤 캘린더 앱으로 열면 된다.
> curl https://zerocal.shuttleapp.rs?start=2022-11-04+20:00&duration=3h&title=Birthday&description=paaarty > birthday.ics
> open birthday.ics
어떻게 보면 “서버리스 캘린더 앱”인 셈이다, 하하. 서버에 상태를 저장하지 않고 그때그때 캘린더 이벤트를 생성해 반환할 뿐이다.
어떻게 만들었나
URL에 “shuttleapp.rs”가 들어간 걸 눈치챘을 것이다. 웹사이트 호스팅에 shuttle.rs를 사용했기 때문이다.
Shuttle은 Rust 프로젝트를 위한 호스팅 서비스로, 오랫동안 한번 써보고 싶었다.
멋진 axum 웹 프레임워크로 프로젝트를 초기화하기 위해 이렇게 했다
cargo install cargo-shuttle
cargo shuttle init --axum --name zerocal zerocal
그러자 시작에 필요한 모든 것이 준비되어 있었다:
use axum::{routing::get, Router};
use sync_wrapper::SyncWrapper;

async fn hello_world() -> &'static str {
  "Hello, world!"
}

#[shuttle_service::main]
async fn axum() -> shuttle_service::ShuttleAxum {
  let router = Router::new().route("/hello", get(hello_world));
  let sync_wrapper = SyncWrapper::new(router);

  Ok(sync_wrapper)
}
변경 사항을 바로 커밋해보자:
git add .gitignore Cargo.toml src/
git commit -m "Hello World"
코드를 배포하려면 shuttle 계정에 가입해야 한다. https://www.shuttle.rs/login에서 할 수 있다.
GitHub 계정에 대한 접근 권한을 허용하라는 요청이 표시된다.
그 다음:
cargo shuttle login그리고 마지막으로:
cargo shuttle deploy이제 zerocal.shuttleapp.rs로 가보자:
Hello World!첫 버전을 배포하는 데 5분도 걸리지 않았다. 깔끔하다! 우리만의 캘린더 앱을 만들 준비가 끝났다.
앱 작성하기
캘린더 이벤트를 만들기 위해 icalendar 크레이트를 사용했다(이 멋진 라이브러리를 만들어 준 hoodie에게 감사를!). iCalendar는 대부분의 캘린더 앱에서 지원하는 캘린더 이벤트 생성을 위한 표준이다.
cargo add icalendar
cargo add chrono # For date and time parsing
데모 캘린더 이벤트를 만들어 보자:
let event = Event::new()
  .summary("test event")
  .description("here I have something really important to do")
  .starts(Utc::now())
  .ends(Utc::now() + Duration::days(1))
  .done();
충분히 간단하다.
파일은 어떻게 반환하지!?
이제 캘린더 이벤트가 있으니 사용자에게 반환해야 한다. 그런데 파일 형태로 어떻게 반환할까?
axum에서 파일을 동적으로 반환하는 예제는 여기에 있다.
async fn calendar() -> impl IntoResponse {
  let ical = Calendar::new()
    .push(
      // add an event
      Event::new()
        .summary("It works! 😀")
        .description("Meeting with the Rust community")
        .starts(Utc::now() + Duration::hours(1))
        .ends(Utc::now() + Duration::hours(2))
        .done(),
    )
    .done();

  CalendarResponse(ical)
}
여기서 주목할 점은 다음과 같다:
- 모든 캘린더 파일은 이벤트의 모음이므로, 컬렉션을 나타내는
Calendar객체로 이벤트를 감싼다. impl IntoResponse는 이를 구현한 어떤 타입이든 반환할 수 있게 해주는 트레이트다.CalendarResponse는Calendar를 감싸IntoResponse를 구현한 newtype 래퍼다.
CalendarResponse 구현은 다음과 같다:
/// Newtype wrapper around Calendar for `IntoResponse` impl
#[derive(Debug)]
pub struct CalendarResponse(pub Calendar);

impl IntoResponse for CalendarResponse {
  fn into_response(self) -> Response {
    let mut res = Response::new(boxed(Full::from(self.0.to_string())));
    res.headers_mut().insert(
      header::CONTENT_TYPE,
      HeaderValue::from_static("text/calendar"),
    );
    res
  }
}
새 Response 객체를 만들고 Content-Type 헤더를 iCalendar 파일에 맞는 MIME 타입인 text/calendar로 설정한 뒤 응답을 반환하면 된다.
날짜 파싱 추가하기
이 부분은 약간 임시방편이라 가볍게 훑어봐도 좋다. 쿼리 스트링에서 날짜와 기간을 파싱해야 한다. dateparser를 사용했는데, 정말 다양한 날짜 형식을 지원하기 때문이다.
async fn calendar(Query(params): Query<HashMap<String, String>>) -> impl IntoResponse {
  let mut event = Event::new();
  event.class(Class::Confidential);

  if let Some(title) = params.get("title") {
    event.summary(title);
  } else {
    event.summary(DEFAULT_EVENT_TITLE);
  }
  if let Some(description) = params.get("description") {
    event.description(description);
  } else {
    event.description("Powered by zerocal.shuttleapp.rs");
  }

  if let Some(start) = params.get("start") {
    let start = dateparser::parse(start).unwrap();
    event.starts(start);
    if let Some(duration) = params.get("duration") {
      let duration = humantime::parse_duration(duration).unwrap();
      let duration = chrono::Duration::from_std(duration).unwrap();
      event.ends(start + duration);
    }
  }

  if let Some(end) = params.get("end") {
    let end = dateparser::parse(end).unwrap();
    event.ends(end);
    if let Some(duration) = params.get("duration") {
      if params.get("start").is_none() {
        let duration = humantime::parse_duration(duration).unwrap();
        let duration = chrono::Duration::from_std(duration).unwrap();
        event.starts(end - duration);
      }
    }
  }

  let ical = Calendar::new().push(event.done()).done();

  CalendarResponse(ical)
}now나 tomorrow 같은 더 많은 날짜 형식을 지원하면 좋겠지만, 그건 다음 기회로 미루겠다.
테스트해보자:
> cargo shuttle run # This starts a local dev server
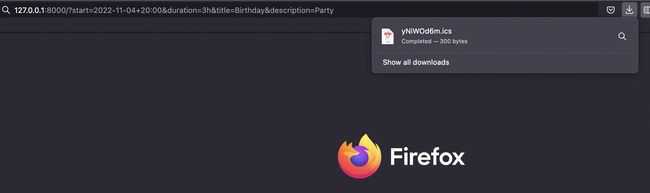
> curl 127.0.0.1:8000?start=2022-11-04+20:00&duration=3h&title=Birthday&description=Party
*🤖 bleep bloop, calendar file created*
좋다, 동작한다!
브라우저에서 열면 캘린더에 새 이벤트가 생성된다:
그리고 터미널로 캘린더 이벤트를 만들지 않는 별난 사람들을 위해 웹사이트에 폼도 추가해보자.
폼 추가하기
<form>
  <table>
    <tr>
      <td>
        <label for="title">Event Title</label>
      </td>
      <td>
        <input type="text" id="title" name="title" value="Birthday" />
      </td>
    </tr>
    <tr>
      <td>
        <label for="desc">Description</label>
      </td>
      <td>
        <input type="text" id="desc" name="desc" value="Party" />
      </td>
    </tr>
    <tr>
      <td><label for="start">Start</label></td>
      <td>
        <input type="datetime-local" id="start" name="start" />
      </td>
    </tr>
    <tr>
      <td><label for="end">End</label></td>
      <td>
        <input type="datetime-local" id="end" name="end" />
      </td>
    </tr>
  </table>
</form>
calendar 함수를 살짝 수정해서 쿼리 스트링이 비어 있으면 폼을 반환하도록 했다:
async fn calendar(Query(params): Query<HashMap<String, String>>) -> impl IntoResponse {
  // if query is empty, show form
  if params.is_empty() {
    return Response::builder()
      .status(200)
      .body(boxed(Full::from(include_str!("../static/index.html"))))
      .unwrap();
  }

  // ...
}
조금 더 다듬고 나니 웹 1.0 감성이 물씬 풍기는 근사한 폼이 완성됐다:
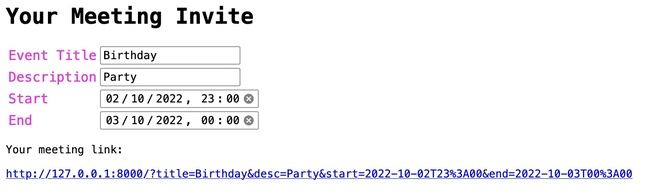
이게 전부다! 이제 캘린더 이벤트를 만들 수 있는 작은 웹 앱이 생겼다. 거의 다 됐다. 아직 배포만 남았다.
배포하기
cargo shuttle deploy그게 전부다. 이렇게 간단하다. 이를 가능하게 해준 shuttle.rs 분들에게 감사드린다.
캘린더 앱은 이제 zerocal.shuttleapp.rs에서 이용할 수 있다.
이제 다음 펍 크롤을 위한 캘린더 이벤트 링크를 친구들에게 드디어 보낼 수 있다. 분명 고마워할 것이다.그러겠지그러겠지
0에서 100줄의 Rust로 만드는 캘린더
다시 간결한 HTML을 작성하니 기분이 좋다.
작은 앱을 만드는 일은 언제나 즐겁다.
GitHub에서 소스 코드를 확인하고 더 좋게 만드는 데 도와주세요! 🙏
몇 가지 아이디어는 다음과 같다:
- ✅ 장소 지원 추가 (예:
location=Berlin또는location=https://zoom.us/test). sigaloid님 감사합니다. - 더 읽기 쉬운 날짜 형식 지원 추가 (예:
now,tomorrow). - 반복 이벤트 지원 추가.
- 시간대 지원 추가.
- Google 캘린더 단축 링크 추가 (
https://calendar.google.com/calendar/render?action=TEMPLATE&dates=20221003T224500Z%2F20221003T224500Z&details=&location=&text=). - 명령줄에서 캘린더 이벤트를 만드는 예제 bash 명령어 추가.
- URL 단축 (예:
zerocal.shuttleapp.rs/2022-11-04T20:00/3h/Birthday/Party)?
이슈 트래커를 확인하고 PR을 자유롭게 열어 주세요!
댓글
로그인하고 댓글 남기기